Using Webmail for DC Metro, IL, MA, NY and PA
Introduction
An introduction on how to use the more common functions available with RCN's Webmail.
RCN Webmail Address:
https://www.rcn.com/hub/customer-center/webmail/
Login with your RCN email address and passwordResolution Steps
-
Attaching to a Message
- On the Compose Page, click Add Attachment
- Select the filename or Browse to the file you want to attach to your message./strong>
- Click Attach. The attachment is added
Changing a Folder Name
- On the Mail Folders page, go to a folder you want to edit and click the Edit button
- Change the folder name
- Click OK. The name of the folder is modified
Trash Folder Deletion Timeframe
- Please note: In addition, messages older than 15 days are purged from the Trash folder automatically; purged messages cannot be recovered
Create an Address
- Right-click on the address in the message or in the message list
- Left-click on Add to Contacts
- Fill in the fields as desired and click Save
Create a Contact Group Address List
- On the Addresses Book toolbar (From the Ajax view), click the menu arrow to the right of New and select New Contact Group. The New Contact Group form is displayed
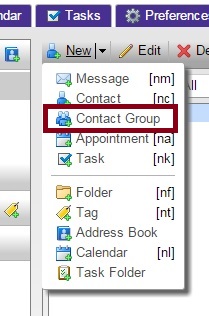
- In the In the Group Name field, type the name of this group list
- To add members to this group, in the Find field, type a name and then click Search
- You can also add email addresses directly in the Group Members list box. Typed address can be separated by a comma (,), semicolon (;) or Return to start the address on a new line
- Click Save. The new group contact is added to your address book
Display Options
- From the Main Menu, click Preferences
- Select Mail on the left sidebar
- The Display options are on top
Deleting an Address or Emailed Contact
- On the Addresses Book Page, select the contact you wish to delete. Contacts folders are organized on the left sidebar
- Click the Delete button in the toolbar
- The address is deleted
Modifying an Address Entry
- On the Addresses Book Page, select the contact you wish to delete. Contacts folders are organized on the left sidebar
- Click the Delete button in the toolbar
- The address is deleted
Moving / Deleting Messages
- On the selected Folder Page, click the check box to the left of the message
-
To move the message
- Go to the Click and hold over the message, then drag it over to the desired folder
-
To delete the message
- Click Delete
-
To delete all messages in a folder
- On the selected Folder Page check the select box in the column header
- Click Delete
-
To delete multiple messages or all emails
-
Standard (HTML)
- Click on the box in the column header
- This will delete all email one page at a time
-
Advanced (AJAX)
- Hold the Shift key and click on the box in the column header
- This will delete all message
-
Standard (HTML)
-
On the selected Folder Page check the select box in the column header
- Click Delete
- Deleted messages are moved to the trash folder
Empty Trash Folder Messages
- Important: Deleted trash folder messages are permanently deleted and cannot be recovered
- In the Trash Folder Page, click the check box to the left of the message - or - check the select box in the column header to Select All
- To move the message to another folder,click and hold over the message, then drag it to the desired folder
- To delete the message, click Delete
- To delete all messages from Trash, right-click on the Trash folder and select Empty Trash. All messages are permanently deleted
Creating Away Messages (Vacation Message)
- Click the Preferences tab
- Click the Mail tab
- In the Receiving Messages section, check Send auto-reply message
- In the text box, enter the message to be sent, such as "I am on vacation. I will reply when I return on April 1, 2017"
- Set the start and end dates for using this message
- Click Save. The away message feature is enabled immediately
Creating a Signature
- Open Preferences and select the Signatures tab
- Because you can have more than one signature, in the Signature Name field give your signature and identifiable name
- In the Signature text box, type the signature information exactly as you want it to appear in your messages
- In the Using Signatures section, select where the signature should be placed in your messages
- Select Above included messages to add your signature at the end of the your composed, replied to, or forwarded text
- Select Below included messages to add the signature at the end of the message
- Click Save
- To apply this signature to your account name, go to the Accounts tab and in the Signature field, select the Signature Name from the drop down
Send a Message
- Click on the New Message icon
- Populate the subject field
- Populate the Message Content field
- Click on the Send icon
Change Password using MyRCN
- Login to your MyRCN account
- Click Accounts & Passwords under in the right navigation bar
- In the Reset Passwords area, select the email address from the drop down list
- Enter the new password twice and click Submit
Change Password using Usertools
- Go to https://usertools.rcn.com/
- Enter user name and current password
- Enter new password twice and Submit
- The change should take less than 5 minutes to take effect
Change Language Preferences
- Click on the Preferences tab
- Select the appropriate language from the list which is accompanied by appropriate country flags
- Click on the Save icon

Sorting Messages
- On the selected Folder Page, click the column head for the method you want to sort message by:
- From - Sorts messages alphabetically by sender
- Received - Sorts messages by date
- Subject - Sorts messages alphabetically by subject
-
Size - Sorts message by size
- To reverse the sort order from the way it is currently set, click the column head again
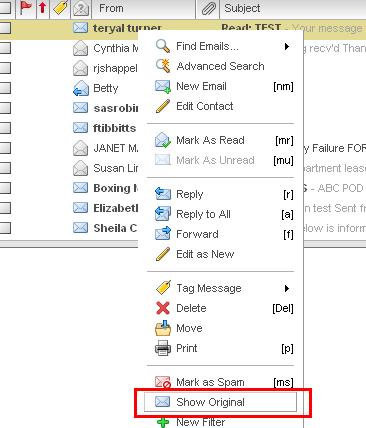
Viewing Message Headers
- Right Click on the message in the inbox
- Select Show Original from the menu
- Headers open in a separate window
Font Size
Control
- Try Browser Zoom controls (CTRL+/-) from there for those customers that need things even bigger
- If your customer is visually impaired, the Standard version of Webmail may display better with browser zoom controls
- If your customer is visually impaired, the Standard version of Webmail may display better with browser zoom controls
- Font size control has been added as of March 7th. Customers can change to the 'Large Fonts' theme
- Go to 'Preferences' 'Login Options' and make their 'theme' "Large Fonts." They'll then be prompted to reload the page
- Try Browser Zoom controls (CTRL+/-) from there for those customers that need things even bigger
- If your customer is visually impaired, the Standard version of webmail may display better with browser zoom controls
- Go to the Preferences tab, select the 'Standard (HTML)' version, log out, log back in, and then use browser controls to make the text larger
Searching for an email - Advanced Search
- Advanced search will allow you to search specific parts of the email
Related Webmail Information
SSL Encryption
-
If there are concerns regarding secured mail:
-
Passwords and the Webmail interface are SSL encrypted via https://
- Customers can configure a 3rd party mail software
- Use SSL on imap.rcn.com port 993 to receive email over an encrypted connection
- Use TLS on smtp.rcn.com port 587 to send email over an encrypted connection
-
Passwords and the Webmail interface are SSL encrypted via https://
Internal Information
Commercial Agent Steps
Financial Agent Steps
Management Steps